
Do note these are limited in numbers and a Spring Thunder does a better job so I'd prefer you go for that instead of these things here.
Since these blasters are so limited and how they so often get out of stock really quick a tutorial lacks so I'm just going to leave this post here anyway,well if you had the chance to obtain one that is,for that good for you!
Opening a package from Monkeemods you'll get these inside:

Unpack it,it'll look like this:

As you can see I have arranged them neatly according to each packet.
Contents are:
-barrel
-magazine tube
-shotgun Grip
-plunger tube
-barrel/mag-tube end cap
-breech
-18 kg main spring(I think)
-plunger rod
-shell lifter
-barrel connecting piece
-swinging gate
- x 2 O-rings
-tube magazine feeder
-trigger spring
-catch spring
-tube magazine feeder tip
-catch plate
-shell ejection support piece
-trigger
-breech gasket
-set of mix screws
-shell lifter spring
-shell ejector metal piece
-barrel gasket
-shell(I ordered extra)
-priming bar
-tube magazine spring
-left side firefly shell
-right side firefly shell
Firstly,grab your mag tube feeder pieces

The video from Monkeemods didn't tell me that's made of plastic,yea the black piece.So hammer it in with a mallet like so

You'll get this:

Next,grab your barrel connector and magazine tube:

Make sure you take the one with larger diameter,and hammer it "gently" at the one with smooth slot,the one with grooves is for the barrel.

You'll get something like this,do note stick your finger at the other end make sure there is little gap as possible,hammer it till it is gone because if not,you'll have trouble feeding shells like mine.
The orange piece tends to crack for some reason untouched but mine doesn't(yet!)
edit:After writing this up,the said piece cracked,way to go.

Now take the mag tube feeder and slot it in at the other end of the tube. tip:you may want to lubricate the feeder piece for smooth feeding.

Now,put the barrel gasket on the other side(grooved connecting slot) and slot it nicely like so,

Afterwards,grab the barrel,the lipped side goes into the gasket.

Hammer it for good measure,you'll have these now:

Do note make sure to hammer the mag tube more,else you'll end up like me with a shitty mag feeding.
Now grab the Shotgun grip and screw it in together,you'll have to use the long silver screws for it.

There's 6 silver screws to use for it.Anyway,slide the grip in the 2 pieces of pipe with the larger hump entering first.

Now then,put the mag feeder spring inside the tube. And close it off with the end cap.Hammer it with a mallet.


Make sure your barrel doesn't go loose 'cause that's what's happened to mine.
After all that,you'll have yourselves,the whole barrel assembly done.Good job!Now proceed on...

Try to play around with the feeder,make sure it is doing what it is supposed to.
Now get your left side shell and the swinging gate.

Just put it in the hole there snug fit.
Now,grab the breech,the shell ejection pieces

Now screw in both these pieces together at the lower side of the screw port,both side of the breech is equivalent at this point so any side will do.
After that,you'll get this.

I used the sharp short black screw for this.(if I can recall)
Now,grab your right side shell and put the lifter spring as such:

A nice place for your hook there.anyway,
remember the left side piece?Yea forget about that.The images I'm going to show you are somewhat wrong but safely put it,just work on the right side piece from now on wards in this guide.

Grab your breech and slot in an O-ring and lube it.(yes both the Plunger tube and breech)

Put it together,get the shell lifter to join in too! and just,put it in the shell.There's grooves to guide you with it so no issue.
Make sure the 2 prongs of the shell lifter is sticking outwards,not inwards,as shown in the image above.


Slot the shell ejector in,and make sure it is,something like this.

As shown,there is a slot dedicated for it so slot it in.
Remember we are working on the right side of the shell...not left!
Image is fake news.

You'll get this.But you know,the other side.

The reason why I asked to work on the right side of the shell first? This is why.Now put in the catch here.that slight hump at the back of the blaster,right next to the stock attachment piece.Hard to miss!

Afterwards,slot in the catch plate as such,with the beveled side facing the rest of the blaster.

Go to the front of the breech,use the breech gasket and put it in there as shown in the image above.

For now you'll get this.The image is corrected now.Don't forget the trigger.
Put the barrel assembly in like so,

And now,put in the plunger rod and spring,make sure to put in the O-ring and lube it up

Put it in to where to should,now the hard part;securing it in place without flying pieces.

In the Monkeemods tutorial,you use the priming bar,for me,I eventually ended up using my hands.Image is just for show.

I'm getting lazy at this point but,a picture for reference minus the spring.

Back to where we were,after successfully placing in the shell.You are good to go and screw them securely in place.

I ended up using a drill to fully secure it.Please do so to ensure.Use the blacks screws for this.Yes,the one with many in number.

Final part,connect the priming bar,use the remaining screws for it.
Tighten it securely and next thing you know...
You have a shotgun! Finally the build is as good as done.Now enjoy the shell ejection and uuuhhh I won't be back for like a year or 2 so...not like you read here anyway but a reunion in this old blog will do. Have fun!


Now take the mag tube feeder and slot it in at the other end of the tube. tip:you may want to lubricate the feeder piece for smooth feeding.

Now,put the barrel gasket on the other side(grooved connecting slot) and slot it nicely like so,

Afterwards,grab the barrel,the lipped side goes into the gasket.

Hammer it for good measure,you'll have these now:

Do note make sure to hammer the mag tube more,else you'll end up like me with a shitty mag feeding.
Now grab the Shotgun grip and screw it in together,you'll have to use the long silver screws for it.
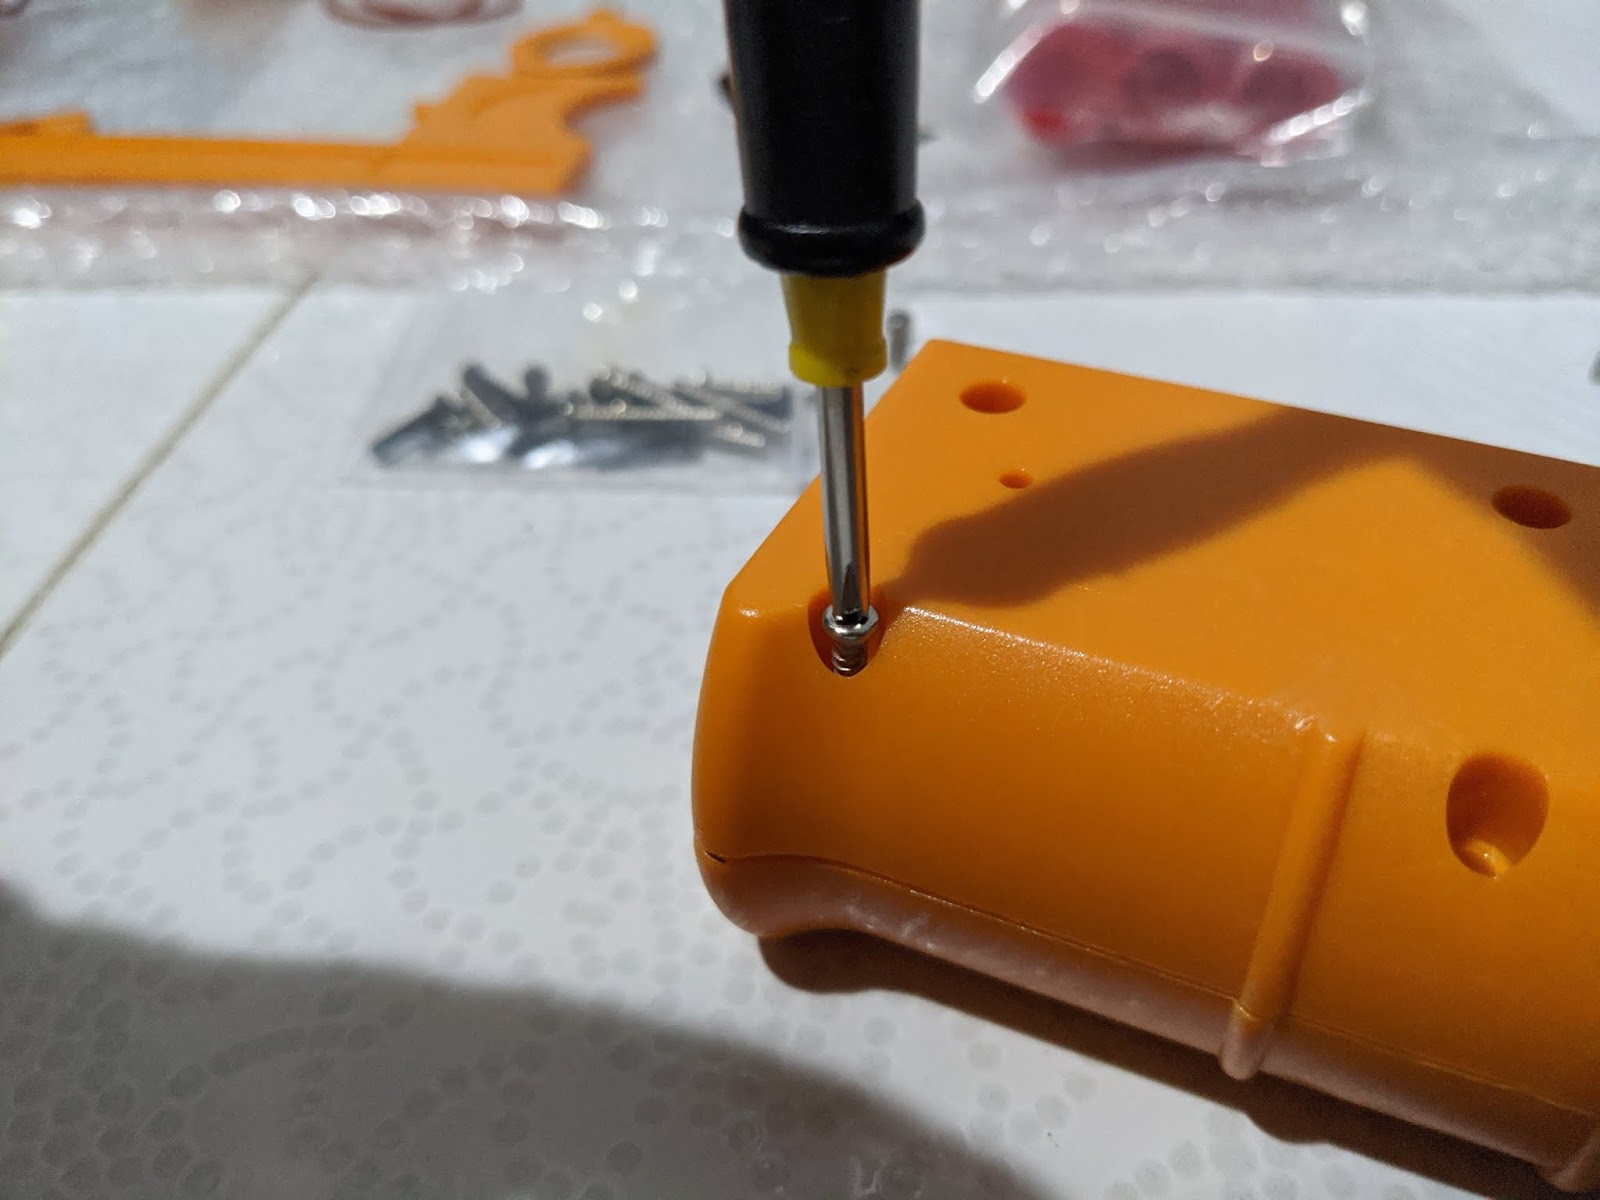
There's 6 silver screws to use for it.Anyway,slide the grip in the 2 pieces of pipe with the larger hump entering first.

Now then,put the mag feeder spring inside the tube. And close it off with the end cap.Hammer it with a mallet.


Make sure your barrel doesn't go loose 'cause that's what's happened to mine.
After all that,you'll have yourselves,the whole barrel assembly done.Good job!Now proceed on...
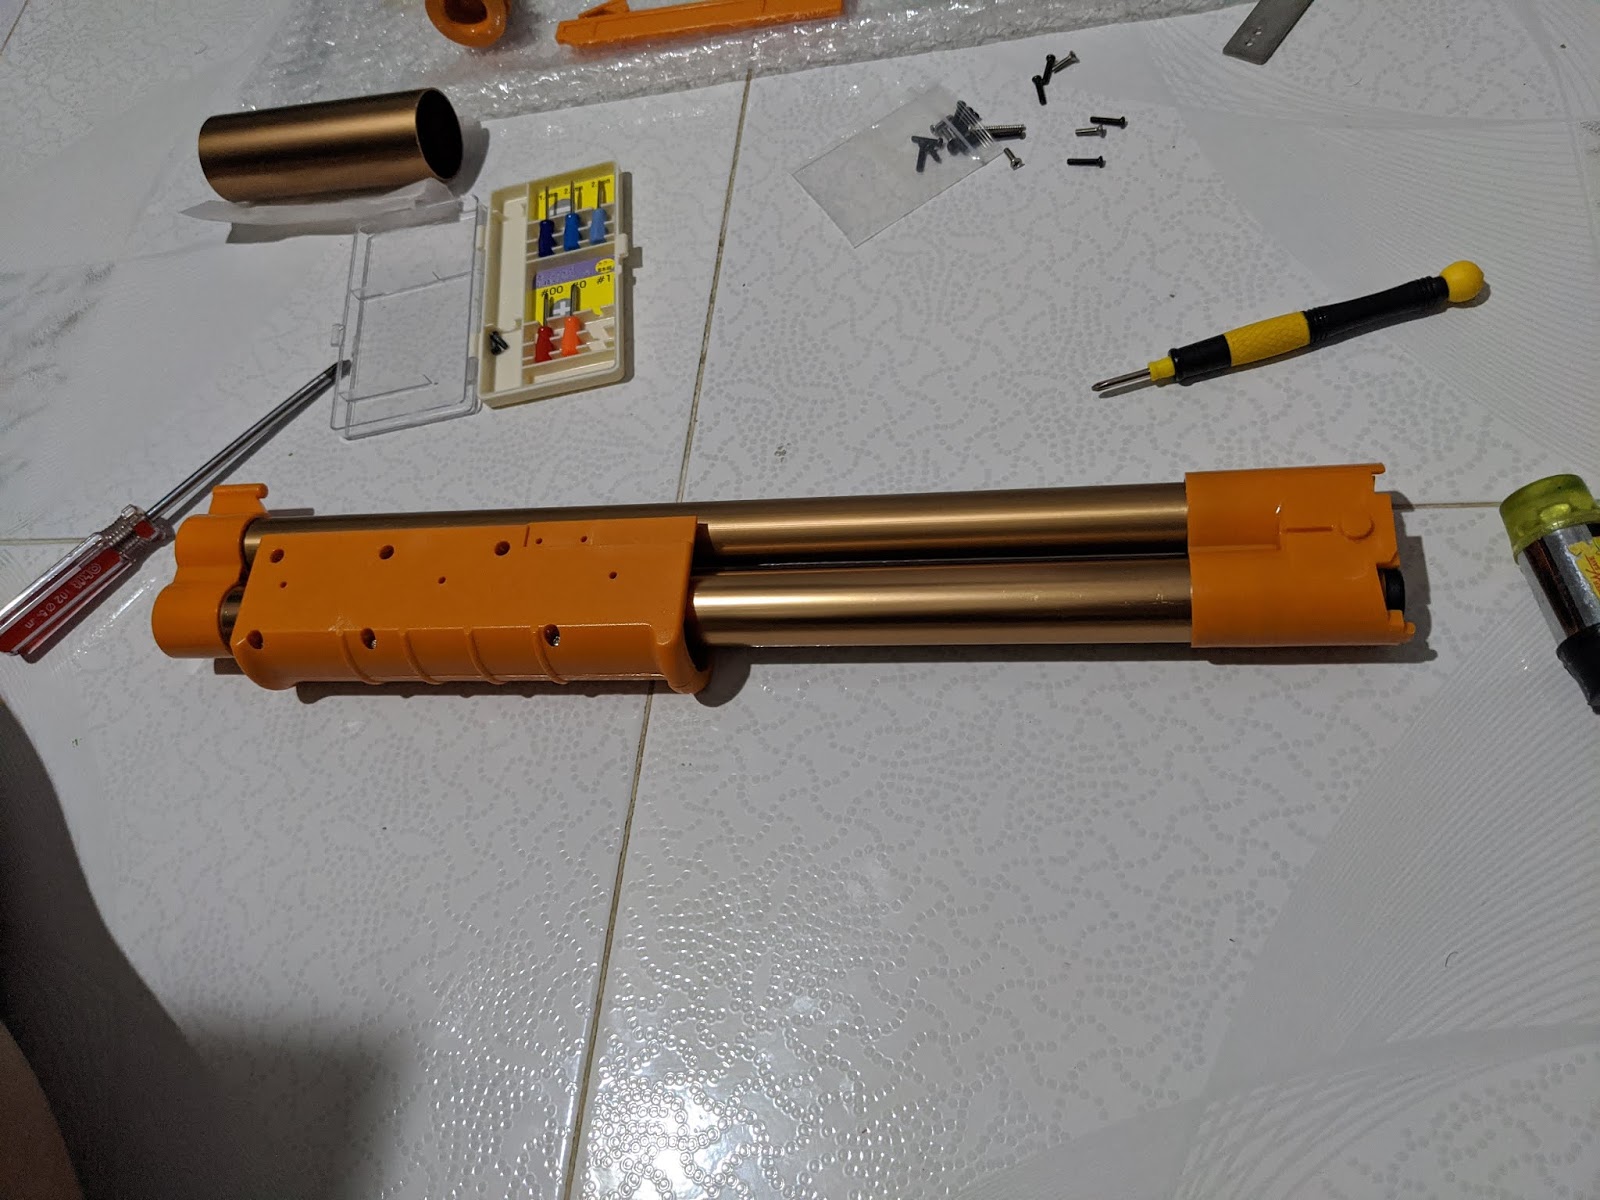
Try to play around with the feeder,make sure it is doing what it is supposed to.
Now get your left side shell and the swinging gate.

Just put it in the hole there snug fit.
Now,grab the breech,the shell ejection pieces

Now screw in both these pieces together at the lower side of the screw port,both side of the breech is equivalent at this point so any side will do.
After that,you'll get this.

I used the sharp short black screw for this.(if I can recall)
Now,grab your right side shell and put the lifter spring as such:

A nice place for your hook there.anyway,
remember the left side piece?Yea forget about that.The images I'm going to show you are somewhat wrong but safely put it,just work on the right side piece from now on wards in this guide.

Grab your breech and slot in an O-ring and lube it.(yes both the Plunger tube and breech)

Put it together,get the shell lifter to join in too! and just,put it in the shell.There's grooves to guide you with it so no issue.
Make sure the 2 prongs of the shell lifter is sticking outwards,not inwards,as shown in the image above.


Slot the shell ejector in,and make sure it is,something like this.

As shown,there is a slot dedicated for it so slot it in.
Remember we are working on the right side of the shell...not left!
Image is fake news.

You'll get this.But you know,the other side.

The reason why I asked to work on the right side of the shell first? This is why.Now put in the catch here.that slight hump at the back of the blaster,right next to the stock attachment piece.Hard to miss!

Afterwards,slot in the catch plate as such,with the beveled side facing the rest of the blaster.

Go to the front of the breech,use the breech gasket and put it in there as shown in the image above.

For now you'll get this.The image is corrected now.Don't forget the trigger.


Put it in to where to should,now the hard part;securing it in place without flying pieces.

In the Monkeemods tutorial,you use the priming bar,for me,I eventually ended up using my hands.Image is just for show.

I'm getting lazy at this point but,a picture for reference minus the spring.

Back to where we were,after successfully placing in the shell.You are good to go and screw them securely in place.

I ended up using a drill to fully secure it.Please do so to ensure.Use the blacks screws for this.Yes,the one with many in number.

Final part,connect the priming bar,use the remaining screws for it.
Tighten it securely and next thing you know...
You have a shotgun! Finally the build is as good as done.Now enjoy the shell ejection and uuuhhh I won't be back for like a year or 2 so...not like you read here anyway but a reunion in this old blog will do. Have fun!


