Wednesday, 27 December 2017
How to install Retaliator reinforcements
Hey it's your boy,duke.Back at it again with the tutorials. This time I would be covering about reinforcements of the Ret. When I mean reinforcements,what I am saying is that your stock internals won't last long.Hence buffing up your blaster for optimal performance uses up power to a point that the joints of such other parts tend to ware out. To compensate for power,you need to strengthen up other internals where friction occurs most of the time.
One part of the Ret that often breaks is the plunger rod due to the rapid slamming of the breech to the plunger,it can ware out quickly.
In this tutorial,I would be using the Worker Boltsled and Plunger Rod Upgrade Kit.
Step #1
Unscrew and open up the shell of your blaster.You should be seeing the internals you might have or haven't modified.
For this tutorial,I would be performing on my personal Ret.
That's why it looks different from the other tutorials.
Specifically for this kit,the parts we are changing out and enforcing are these two. (and yes,maybe the catch plate at the background.Depending on the strength of the catch spring.)
And of course,these are the parts you'll be using that comes with the kit.Not to mention, you also have that small zip lock bag containing small parts and a small capsule of lubricant provided.
Step #2
For now,let's focus on the boltsled.
Remove the pin retaining your pusher breech.This one's a stock breech because I use this blaster mainly for games that uses that dart type.
Ever since this blaster was broken a few months back,I wasn't playing seriously such as using bizarre blasters and a blowpipe.
Anyway,back on track.
Here's a tip! If you happen to struggle with the pin itself,like if it is too tight,friction-fitted you may use a pair of pliers to pull it out.Well,providing that a good portion of the pin is already out.
Take note,this is optional but if you mind the locks,the boltsled has one installed.So be sure to remove it or else you won't be able to deprime!
You'll be getting this.Some upgrade boltsleds may not come with the locks pre-installed for obvious reasons but personally,for an upgrade part without a lock,is doing a favor for both the company and the modder themselves.
Now,that you've modified the sled,you may want to install back the pusher into the new boltsled.
Just insert the pusher to the slot and place a pin through to fasten them together. It maybe too tight so be sure to use a hammer when necessary. A tap will do and excessive force will surely break your newly attained part.
If you happen to use a pump grip,be sure to put them back in.The modkit happens to come with two pins. So be sure to use your own ones. As for the golden pins given,I have no use for them so I just left them in the bag.
Step #3
Now that the boltsled part is done,now we shall be focusing on the plunger rod.
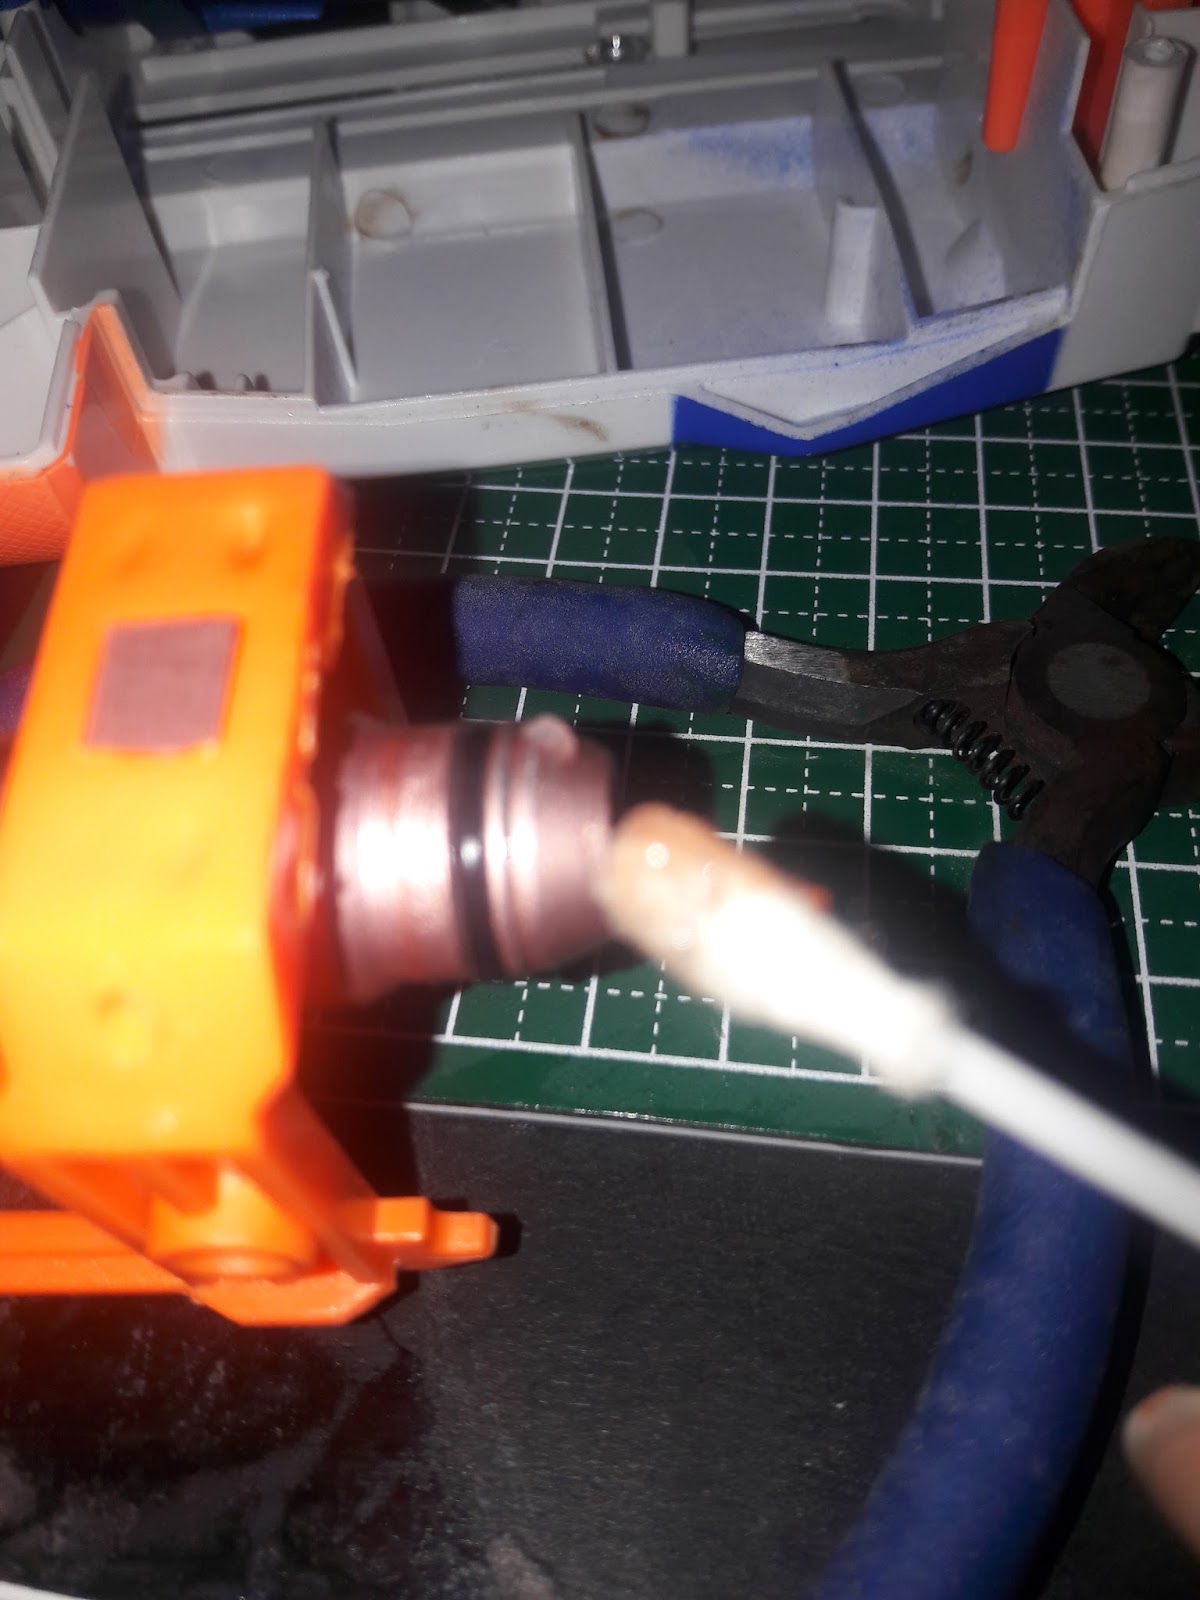
Take the O-ring given and sleeve it over your plunger rod like this:
And you're basically done.
Technically,not really.You still have one last step to make this work it's wonders.
Knowing that these are parts of friction. Be sure to lubricate them evenly.The modkit comes with a capsule of lubricant so you can use that.
Don't dispose the capsule after use! You will still need it for future use!
Insert the plunger rod into the plunger tube and use the rod to coat lube within the tube.
Also,remember to lubricate your boltsled. Wherever friction is present on a certain area of a shell or internal.Always use the lubricant.
Step #4
Now that that's done, put back the internals:
This time,I've decided to install an Artifact trigger for the looks.
Close up the shell,screw everything tightly and you're done!
Congratulations! You have completed the mod process. :D
Tuesday, 21 November 2017
How to install a spring for the Ret
So a little update on my blog again...
Knowing that this blog will serve somewhat as an archive of the relics of today,I will not invest much in it so anything from my horrible English to poor formatting will go as crude as it can be (as of now).
Alright. Let's begin!
Today,I'm going to show you probably the simplest of proper modding to a springer. That is,of course,the spring upgrade.
This tier of upgrade is on par or just below a tier of a modification such as the classical 'Brass Breech' depending on what blaster it is. Anyway, for a spring upgrade for today,I am going to use the Ret previously displayed last tutorial.
I say again,I trust that once you are here,you are a modder with sufficient tools. Or at least,have proper tools for the occasion.
Step #1
Open up your shell.I guess that now I'm using the Ret,you should be familiar with it.
Lest you are lost,here are the hidden screws you need to be cautious of when handling a stock Ret or a Ret with a grip such as the picture given above or similar.
Also,note that in the picture I have taken out the buttstock adapter so please take that out first.
Upon opening,look up closely on this section of the blaster.That shall be the area you shall be working on this tutorial.
Step #2
Here's a comparison on what an upgrade spring(top)
and the stock spring(bottom) should look like. For this tutorial,I would be using an 8kg spring from Zinv.It has been modified by my dealer who I bought this from to have flat ends;it was filed down.
Now,as easy as it seems...
You have to do a bit of work to get it to properly function.
Firstly,you need to upgrade the catch spring.
This is what you should be getting if it is unmodified.Now our task here is to beef this up.
Long thin spring = black pen
Short fat spring = blue Pilot G2 pen
These are the springs I usually use when handling a light springload. These springs can be obtained from everyday items such as pens. As a modder and a student,I ensured that once I'm out of ink,I would extract the spring of the pen before discarding it.
Usually,depending on where you buy your springs from.Method of installation might slightly differ due to the orientation and size of the specific spring you're using.Please mod accordingly of which your spring would rest and compress to the best fitting possible.
I advice you to use a catch spring given alongside your main spring if you happen to purchase a spring from a seller. But in a scenario such as this where you weren't given a catch spring, pens would do.
Now place the new catch spring (or if you are using 2 springs with different diameters,place both spring in where you have an inner and outer catch spring) on the slot of where you took out the old catch spring. If you are using pen springs, please do cut accordingly to the size of the old catch spring or maybe a coil taller from the former spring.
Once done,I advice you to glue it into place. Wait for it to dry.
(optional)
Step #3
In the meantime,while waiting for the glue to dry on your catch,do your maintenance since you opened the shell up.
When becoming a modder,one thing that is misunderstood by the public is once modded,it is invincible.But most cases,this is not the case.If you have the decency to open up the shell to mod,you have to maintain it. So please, do a routinely maintenance on your blaster accordingly. For the Ret,I would be lubricating the o-rings and the parts of the blaster where it involves movement or friction.
Now that you are using an upgrade spring,I suggest taking out the boltsled lock (optional) as you would be able to deprime the blaster when chambering nothing or to prevent a dry fire which ultimately and eventually worsen the performance overall BUT you would still face this problem of ware-and-tear on the field or shooting foam darts.
Moral of the story is,make each shot count!
Step #4
Now that you have done the following,put back your internals,slot in the new spring.
Depending on the spring,you might want to do a slight shell work,so take a file and open up the hole a bit. Sometimes,you don't even need to do this if your spring can perfectly sit inside. (skip when necessary)
I assume at this point your catch spring should dry up by now so place your internals to where it belonged and close up the shell.
Step #5
Now,like I said,your spring may vary.If your spring is slightly longer,close the shell while leaving a coil and a half sticking out.Once tightened,push in the spring entirely. (skip when necessary)
Please be careful when modding.You may cut yourself. I almost did with this part with the filed end of the spring.
In the end,I had to open up the shell again and slowly force the spring sitting inside the shell entirely .
Otherwise,put back the stock adapter and you're good to go.
Now marks the end of the tutorial. Have fun!
Monday, 13 November 2017
How to install the Artifact Punisher Kit For Retaliators
Hey,it's ya boi,Duke Cashless back at it again with the shit. I've realised how lazy I am to write out a blog because I don't want to accidentally expose nuclear launch codes but at the same time,I have to pity those underneath the NERF hierarchy so I've decided to do a mod guide on how to install a mod kit.Specifically this chunk of aluminium called "Artifact". Let's begin!
What you'll need is tools.I trust you are smart enough to work like a Neanderthal with crude tools and what to use.If you see a problem to it,you know what tool to use,so go ahead.
But for this tutorial,I've decided to go with the following:
-Mini screwdrivers of variable sizes
-Screwdriver bit
-Drill <---- Ironic
-Vaseline
-Red Lithium Grease
-Allen key of variable sizes
Tuesday, 17 October 2017
Introduction to Blog creation
Welcome to Duke's Nerf Korner where we get our shit together as Singaporean Nerfers
So as of 17/10/2017,I have decided,upon vote, to create this damn blog as a response to some people asking on how to get into the hobby and what to do and what not to do in the Nerf Community based in Singapore.
I will be covering mainly installing modkits that weren't given an instruction sheet or unclear and solutions to a technical error on a blaster. However,I am not limited to those options as I would also be covering up my progress in Nerfing and etiquette as a Nerfer in Singapore(or at least how I behave or something) and builds on what to carry to field: from practical to joke,from expensive to budget. Do note that these are just my experiences but this blog will include the community's recollection and accounts based on particular topics;interviewed and through memory.
But please,do make yourselves comfortable and grab a HyperBeast Longshot money can buy so that you can have a mediocre experience in the eyes of a low-tier yet ambitious player.
Subscribe to:
Posts (Atom)